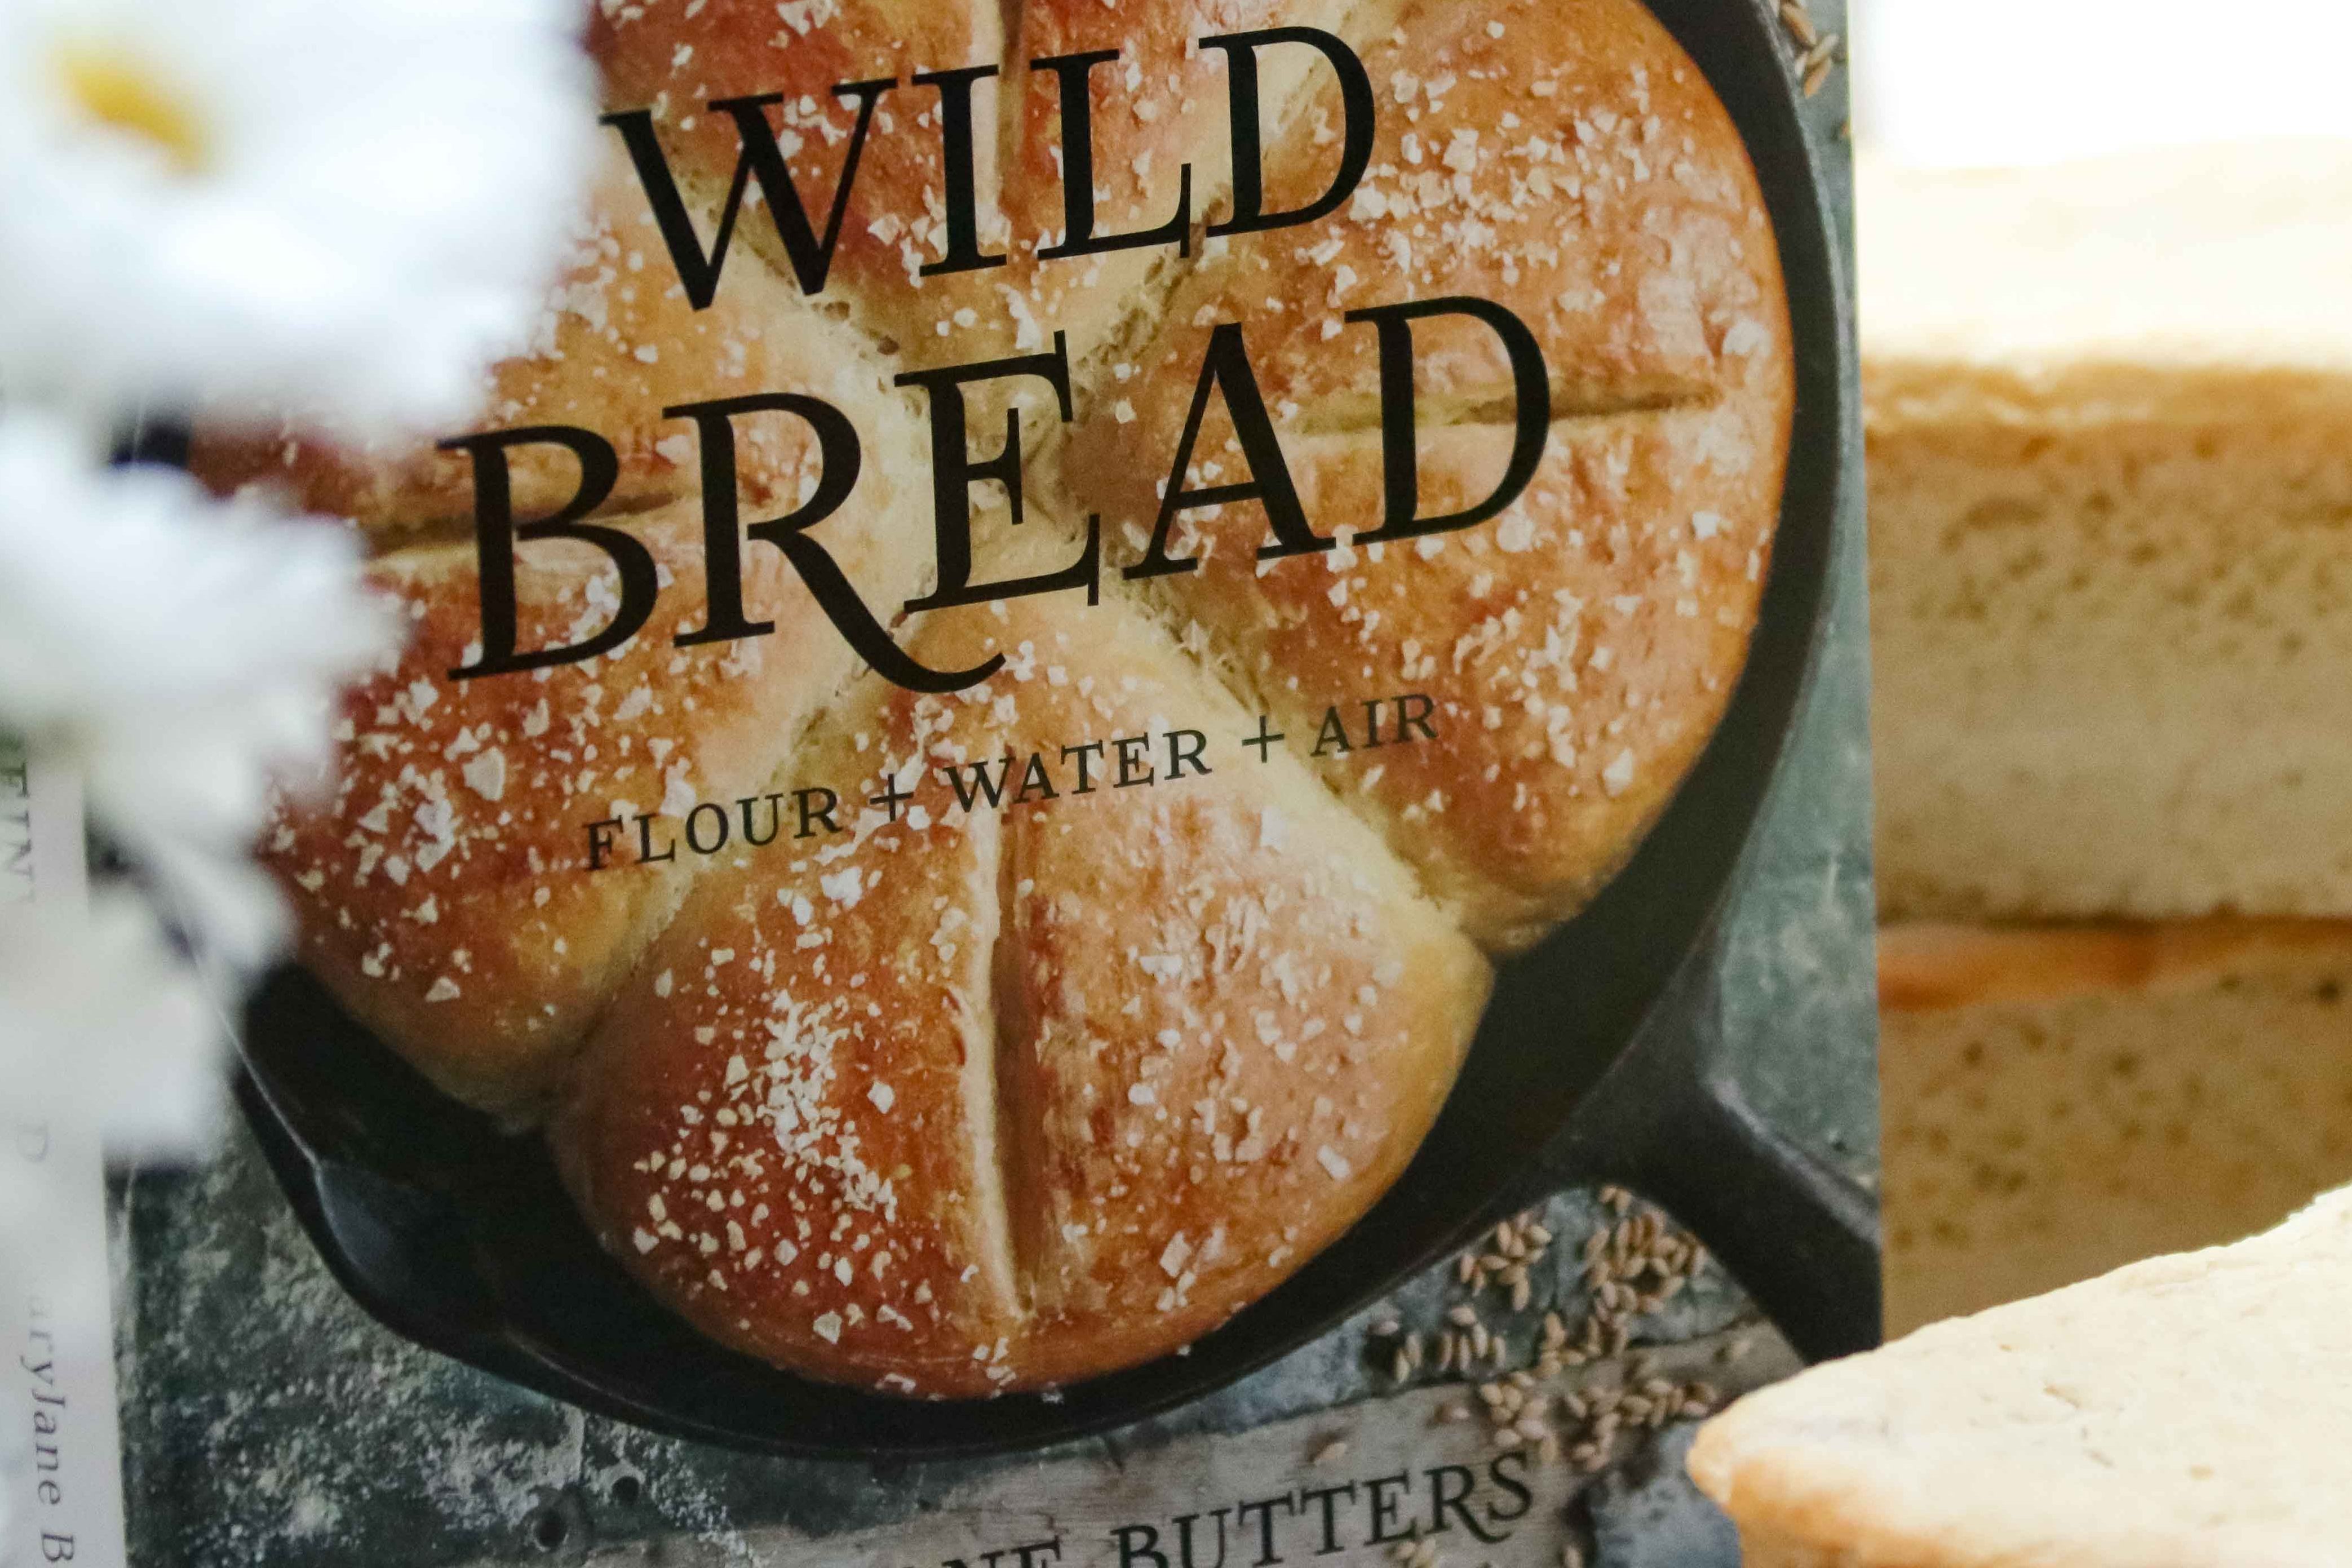
The sourdough fad is going strong. I don’t really know when and how it became a fad, I just know it is. Aside from the social media points a person apparently gets if they make sourdough, there actually are reasons to make sourdough (wild yeast) breads versus commercial yeast breads. I won’t get into those benefits, other than to say any time something is fermented (like sourdough, milk kefir, yogurt, kombucha…), the nutritional content of that thing becomes more bioavailable and easy to digest.
I started the sourdough process a couple years ago, and quickly found myself getting lost in the various techniques and what felt to me like complicated processes. Although there is a wealth of information available online for sourdough baking, there is also a proclivity of many to overcomplicate what is actually an ancient and simple process. All I wanted to do was to be able to have fresh sourdough bread every week. I didn’t necessarily want to spend 8 hours babysitting a loaf of bread. The weight in grams of so many recipes also turned me away somewhat. Don’t tell me to bake bread like great-grandma did and then require the use of a digital scale or nitty-gritty weights and measurements.
MaryJane simplifies the sourdough processes with simple recipes for delicious batter breads geared towards an immature starter (but that are perfectly fine for mature starters), kneaded and beautiful artisan-style loaves and other baked goods. All of her recipes include measurements for a variety of flours, including gluten free flour, as well as modifications for some flavored breads.
She walks the reader through getting a starter (or “mother,” as she calls it) going strong, including gluten-free starters, and makes recommendations on equipment to use. Many of the items she recommends can be easily approximated and likely are already in your kitchen, especially if you are content with simpler breads! So don’t be turned off by her extensive equipment list. She has recipes for artisan boules, baguettes, pizza crust, hamburger buns, sandwich loaves, and the list goes on, including some unique breads we don’t see a lot of here in the United States.
There a section of recipes for “sourdough enhanced treats,” such as savory herb and cheese muffins (delicious), a sourdough cake recipe, and let’s just say the sourdough cake donuts are already borderline famous around here. I have made them a handful of times and they never last long and always go over extremely well when we work cows!
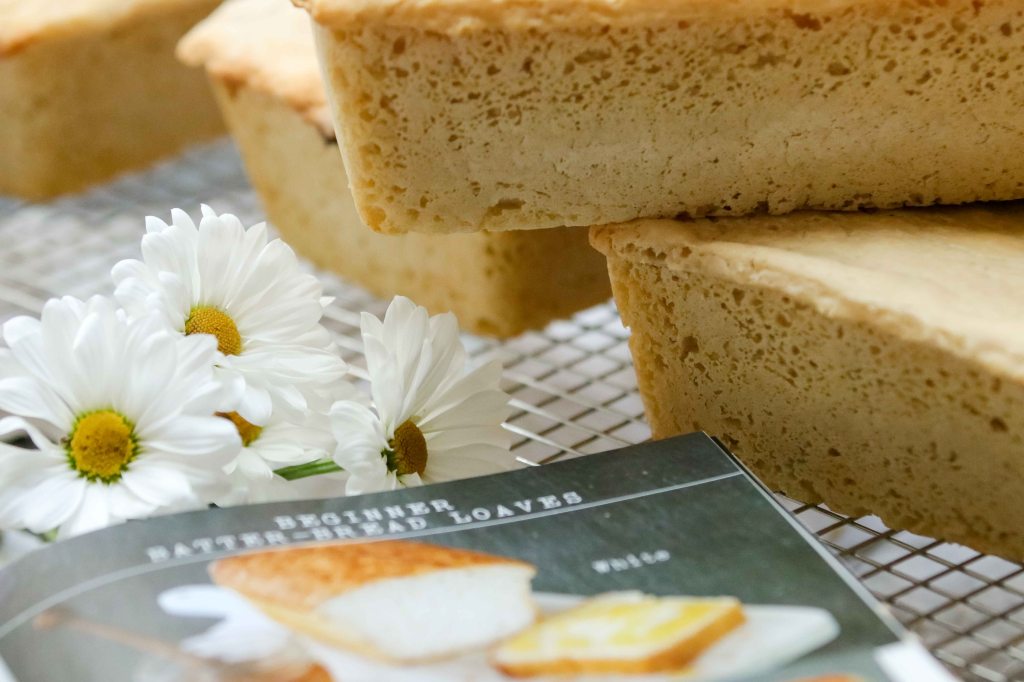
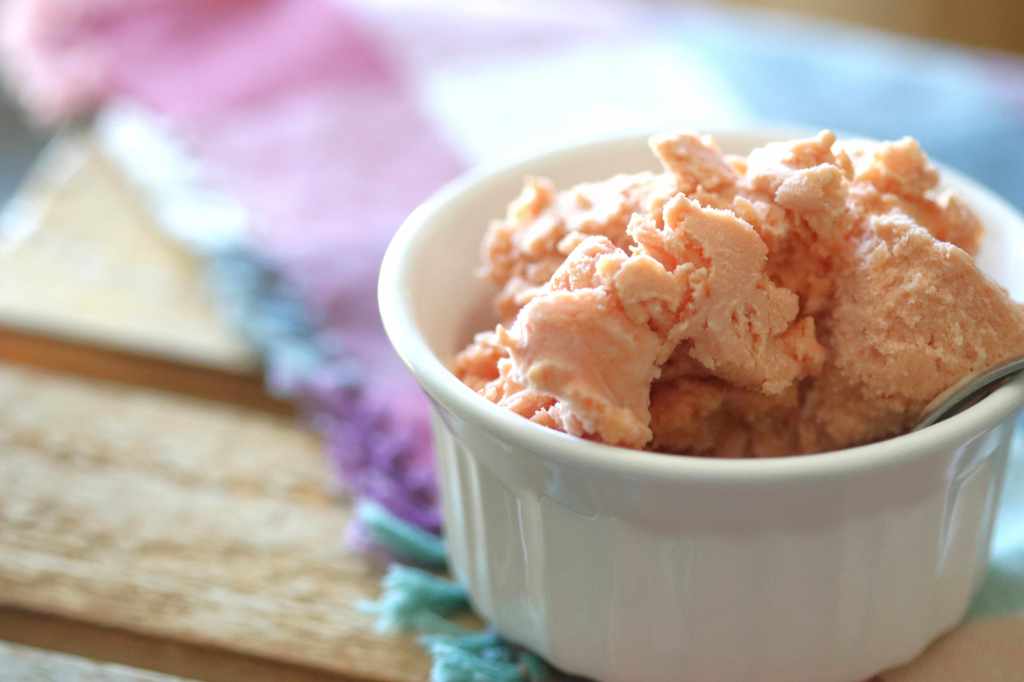
The recipe I have used the most is her batter bread recipe. As mentioned above, batter bread is geared towards an immature starter, and the basic idea is that it is a batter that is fed daily for a week until there is enough “activated batter” to bake bread. At the time of baking, it has been fermenting slowly for a week and has a wonderful sour flavor, excellent texture, they are essentially foolproof, and all that without babysitting a loaf of bread. They aren’t the prettiest loaves, but I’m more about functional than fashionable when it comes to bread baking. Is it bread? Check. Does it taste like bread? Check. Can I put butter on it? Check. Does my husband like it? Check. Extra points if it freezes well, tastes nice and sour, and has a good moist and chewy texture. Check, check, check. In general, when I make batter bread, I do a double batch yielding four or five loaves, and then freeze the extras. They thaw out great and have been favorably received at family holiday gatherings as well!
I have heard this book touted as “the only sourdough book you will need.” I would tend to concur.
Support Song Dog Journal and share to social media!
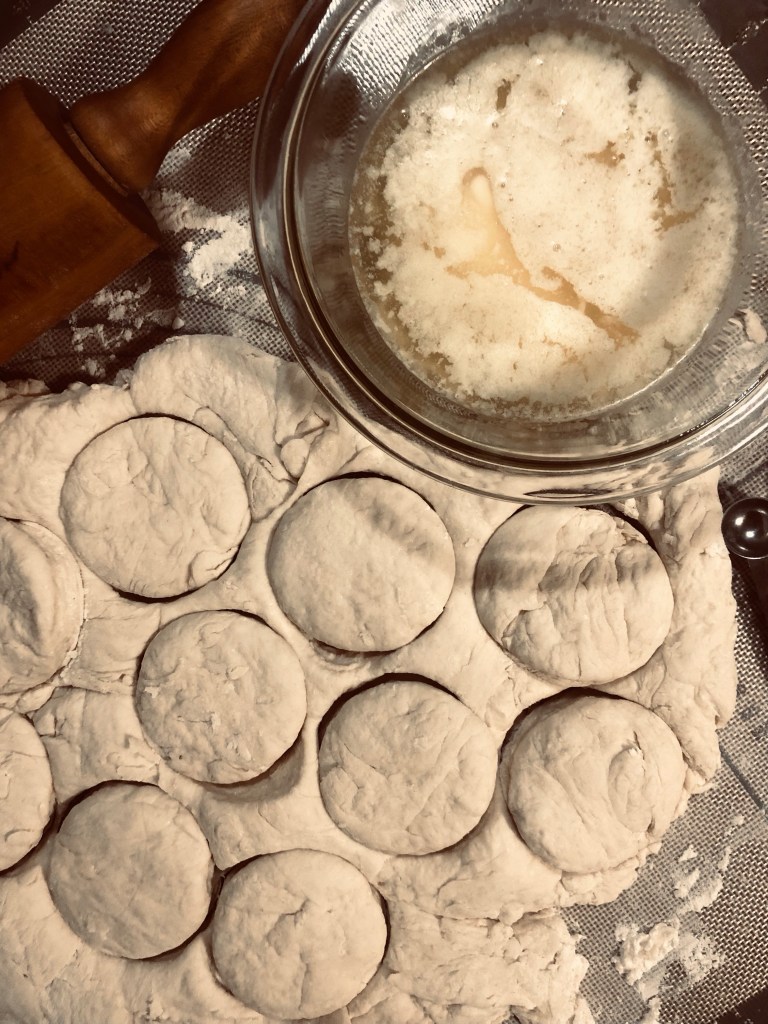
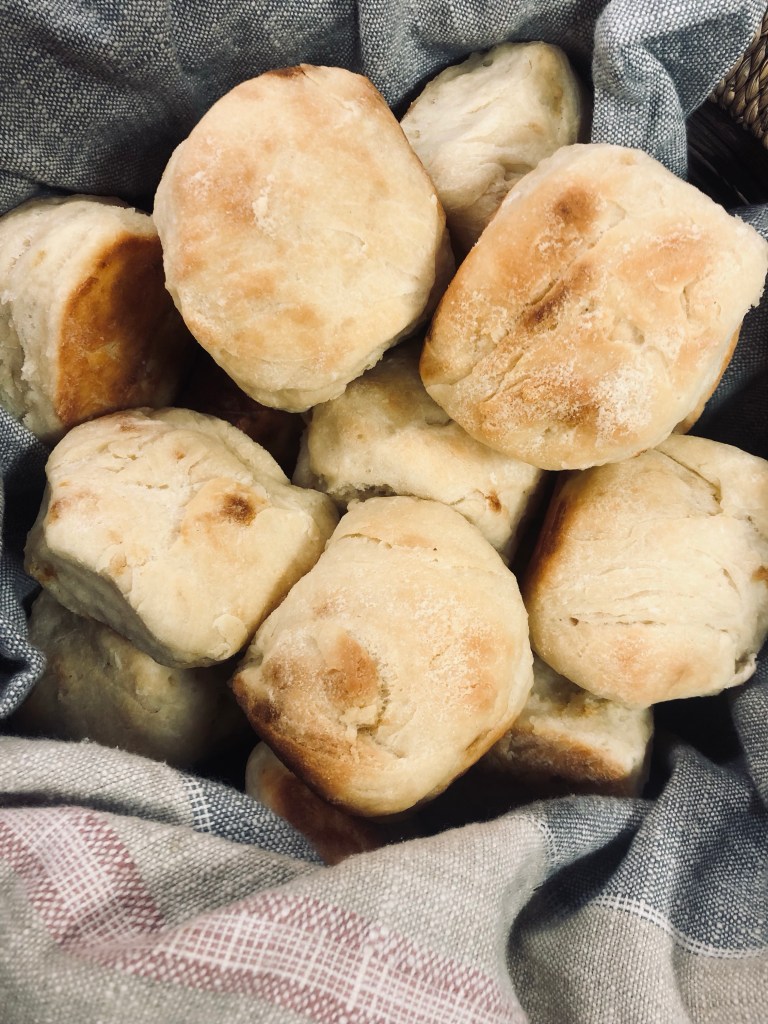
This delicious sourdough biscuit recipe is shared from the book Bacon and Beans: Ranch-Country Recipes, a Western Horseman book by Stella Hughes, published in 1990. It is a pretty foolproof recipe, comes together quickly, and with the addition of some baking soda you are just about guaranteed some fluffy biscuits!
Ingredients:
1/2 c. sourdough starter 1 c. milk 2 1/2 c. flour 3/4 tsp. salt 1 tbs. sugar 1 tsp. baking powder 1/2 tsp. baking soda bacon grease or butter, melted
To Make:
Mix starter, milk, and 1 cup of flour in a large bowl and let sit for 8 hours or overnight. Cover with a towel and keep in a warm place. When ready to use, turn sourdough batter out onto clean surface with 1 cup of flour. Sprinkle salt, sugar, baking powder, and baking soda over the top of the batter, followed by the remaining 1/2 cup of flour. With hands or a spatula, mix dry ingredients into dough, kneading lightly. Handle as little as possible! Roll out approximately 1 inch thick and cut with biscuit cutter. Dip in melted bacon grease or butter, and place in a baking pan. Let them touch, but don’t overcrowd. Let rise in a warm place for about a half hour, and bake at 375 degrees for 30 minutes or until they are golden brown. Makes about a dozen biscuits.
Notes:
Handle the dough as little as possible to keep biscuits from getting tough. It can be difficult to get all the flour incorporated–Don’t worry about it! Instead of kneading, I try to stretch and fold to incorporate the dry ingredients into the dough, but don’t try to get the dry ingredients all moistened or evenly smooth, or you will over-knead and have tough biscuits.
I find that a single batch fills a 9×9 baking pan, with a couple biscuits leftover, which I tend to cook in a separate smaller dish. Depending on how thick they are cut, obviously, you could stretch the yield on this recipe. There is a considerable amount of oven spring with this biscuits–they will puff up in the oven! They are served best fresh out of the oven, and I love to serve these with homemade butter and homemade jam! They’re always a hit.
Enjoy!
Support Song Dog Journal and share to social media!
As the Advent season rolls into Christmas, the tastes and smells of the season bring back so many memories. A handful of chicken-scratch recipe cards foster a connection with my heritage, and remind me of the many family Christmases crowded on hand-built benches around my grandparents’ long hand-built table. After supper was over and we all were stuffed, a tin of little round cookies would be passed around, tasting mildly of pepper and licorice. The adults always went for these more enthusiastically than the kids, but as I’ve gotten older this recipe has become very nostalgic for me, and I love to make these in bulk to gift at Christmastime!
Pfeffernusse are spicy, crunchy cookies that are a traditional German and ethnic Mennonite favorite, and translate to “pepper nuts” – they do contain black pepper, but add a little extra for a little extra kick! Molasses, black coffee, and anise extract add to the warmth of the flavors in this simply little cookie.
Ingredients
1 c. sugar 1 c. shortening (can be replaced with 1 c. butter) 1/2 c. dark syrup (can be replaced with 1/2 c. molasses) 1/2 c. molasses 1/2 c. cooled black coffee with 1 tsp. baking soda 3 T. anise seed extract *can also add 1 tsp or more of ground anise seed for additional flavor
6 c. white flour (or half and half white and whole wheat) 1/2 tsp. salt 1/4 tsp. nutmeg (double this!) 1 tsp. cinnamon (double this!) 1/2 tsp. cloves 1/2 tsp. black pepper (double this! Or triple…or more! How spicy do you want it?) 1 tsp. allspice
To Make
Cream together the first 7 ingredients; add flour and spices. Chill for an hour or so to make the dough easier to work with. Roll in 1/2 inch rolls and chill (or freeze). Slice into quarter-inch thick discs, place on cookie sheets with not much space between them (they don’t spread too much), and then press your thumb gently into each cookie to flatten a little. Bake at 350 degrees for 8-10 minutes.
Notes
I noted most of my substitutions in the above recipe. I ALWAYS add extra anise. My uncle has actually used anise oil from NOW Foods, but I think it affects the crunch of the cookies. I just use plenty of anise extract. You can also add anise seed if you want a little extra bite, though I do recommend grinding them for better flavor, as well as better texture. Also, the quantity of the spices is on the mild side, so be brave and play with the quantities to get the bite you want! I don’t generally double the cloves, since cloves are such a distinct flavor and I don’t want to interfere with the anise, which is the star spice in this cookie. Grandma’s original recipe calls for shortening and corn syrup, as noted above, but I prefer to cook without those things, so I noted my substitutions. But sometimes faithfulness to Grandma’s recipe means something.
The dough should be chilled or frozen before slicing, as stated above, and I recommend freezing, since the dough is a lot easier to work with. This makes it incredibly easy to make a bunch of dough, roll into snakes, freeze, and then bake whenever you get a chance! They also freeze really well after they are baked. Brad and I have enjoyed pfeffernusse months after they were baked, which is great since the first time we made these together we had Covid and couldn’t taste anything.
And there really is something special about baking cookies that have been so traditional for my family. How about you? What are some favorite family recipes you grew up with, and are there any you continue to bake or cook for the holidays?
Support Song Dog Journal and share to social media!
Nothing says summer better than a bowl of the best, creamiest homemade ice cream! Usually I make peach ice cream, but I decided to use some of the plum pie filling I had canned this past fall, and the result was fantastic.
We were gifted a Cuisinart ice cream maker for our wedding, one of those random gifts that took us completely by surprise, and we have loved it! It is extremely simple to use, and the recipes are easy to modify. The mixing bowl just lives in our freezer to be used whenever desired, or it takes about 24 hours for the bowl to freeze before use, the recipes mix up in about 5 minutes and chill in the fridge for a few hours, and the ice cream itself is made in about a half an hour of mixing and freezing. Basically, it is just an easy and fun way to serve up desert for a group, without heating the house up on a hot day! This recipe is based off a Cuisinart recipe.
Ingredients:
1 1/2 cups plums or fruit from plum pie filling, pureed or chopped
3/4 cup whole milk (or half-and-half)
1/3 cup sugar
pinch of salt
1 1/2 cups heavy cream
A generous splash of vanilla
Directions:
Combine milk or half-and-half, sugar, and salt in a bowl and whisk until the sugar is dissolved. Puree the fruit in a blender, and add to the bowl, along with the cream and vanilla. Stir well, and refrigerated for at least two hours.
When chilled, pour into ice cream maker mixing bowl and follow manufacturer instructions.
Serve immediately when desired consistency is reached, or freeze for a harder ice cream.
Notes:
I mostly used the fruit from the canned pie filling, leaving the syrup behind, which happens to make excellent ice cream topping…Since there is sugar in the pie filling, and because I like things less sweet anyway, I cut the sugar back to 1/3 of a cup instead the 2/3 of a cup the original recipe calls for. If you use fresh plums, you might want to use the full amount of sugar. My original recipe also calls for whole milk, but I like using half-and-half instead, or at least adding some half-and-half to the whole milk for some extra creaminess (if I’m going to indulge in dessert, it might as well be extra creamy and extra good!).
Enjoy!
Support Song Dog Journal and share to social media!
Over the past several years, I have grown to enjoy home fermentation projects, from yogurt to sourdough, and of course kombucha. Kombucha is one of those weird, hippie-esque beverages originating in Asia somewhere a few thousand years ago that gets really, really mixed reviews. It is pretty simple, honestly, just a fermented sweet tea with or without the addition of fruit or fruit juice. It is touted for many health benefits, boasting healthy probiotics similar to yogurt or other naturally fermented foods and beverages. Good kombucha is pleasantly effervescent and has an appeal reminiscent of wine, if it is a lighter kombucha, or even beer, if it is a stouter one. As a product of fermentation, there is alcohol in it, but very little. I specify “good kombucha,” because some of what you can purchase at stores has strange things added to it or has fermented too long and has turned vinegary, both of which can affect how palatable it might be.
I am far from being an expert on making kombucha. If you want expert advice, I suggest any number of books that exist on the subject, or websites or Facebook groups dedicated to “home brewing.” I have a very simple recipe that a friend gave my sister several years ago, and I’ve just tweaked it here and there to suit my preferences. All I’m sharing is a recipe and method that I have found to work reliably.
To make your own kombucha, you need the following:
A half gallon jar
A scoby (what? See below)
2 cups of mature kombucha
4 cups of brewed green tea (with 1/2 cup sugar dissolved)
First fermentation:
Brew tea, either green or black or a combination, though my preference is green tea – I like to do 4 green tea bags in 4 cups of hot water, add the 1/2 cup sugar while it is hot, and let it cool before removing the tea bags. This will take a few hours, so plan accordingly.
Place your scoby and the 2 cups of mature kombucha in your brewing jar, and gently pour the cooled sweet tea in with the scoby. The scoby may or may not float, which doesn’t matter. It will form a new layer on the top of the tea, regardless. Cover the jar with a coffee filter (or square of muslin or paper towel), secure with a rubber band, and place in a warmish location. And wait.
Depending on how warm your house is, your kombucha might brew as quickly as 1 week, or might take closer to two. If you’re doing this in the summer and your house is very warm, it might be done even quicker than a week! Taste it after five days or a week and see how the flavor is. If it is lightly carbonated and not too sweet, then proceed to the second fermentation (described below). If it is pretty flat and very sweet, let it sit another few days. Err on the side of checking too soon, since once it has gone to vinegar it isn’t very salvageable, except to save 2 cups back for a new batch.
Second fermentation:
If you like the taste of the kombucha after the first fermentation, you sure don’t need to proceed to a second! If you want a fizzier tea, proceed with the second fermentation.
Leaving 2 cups of kombucha and the scoby in the jar (to be used as the starter for a new batch just like above), pour off everything else into a smaller Mason jar or a bottle with a swing-top, such as these by the brand Otis. Add a half a cup or so of fruit juice (I use homemade cranberry juice), close the lid, and let it sit for two days or so. This is called the second fermentation. The remaining sugar or any added sugar from juice or fruit added at this phase feeds the scoby and the fermentation continues, but with the sealed lid, the carbon dioxide formed during fermentation is contained resulting in natural carbonation. This part of the process is probably the least predictable and takes some trial and error, and honestly I rarely get the perfect second fermentation. Too long of a first fermentation and not enough sugar remaining (and not enough added for the second ferment) and there isn’t enough sugar to get the carbonation. The temperature in your house will affect this as well, with how quickly the fermentations take place. If you get a good first fermentation, though, the kombucha is still delicious.
After a few days, taste the bottled kombucha and see if it is to your liking! If it is, congratulations! Keep in the fridge to prevent it over-fermenting and getting vinegary. It will continue to ferment a little in the fridge.
If it isn’t quite to your liking, seal it up for another few days, or even add a little more fruit juice for some sugar. Depending on how good the lids are on the jars or bottles you’re using, you might want to crack the lid after a couple of days to prevent the pressure from building with the carbonation and exploding the jar. I have heard reports of this happening, though I haven’t had it happen to me…yet. Some people put their bottles in cardboard boxes, or you could also wrap the bottles if you’re concerned about them exploding.
A couple of notes:
What in the world is a scoby? Actually, “scoby” should be spelled “SCOBY,” since it is an acronym for Symbiotic Colony of Bacteria and Yeast. Basically, it is a bacteria and yeast mushroom that grows on the top of the brewing kombucha, and is what metabolizes the sugar to produce the fermentation that makes kombucha so nutritious and delicious. It is also called “the mother.” With each successive fermentation, the scoby will add a new layer on the top and eventually you’ll be able to separate or divide the layers into separate “mothers.” People who have been brewing kombucha forever often keep scobies in “scoby hotels,” for future use. This is the easiest way to obtain a scoby, from a person with extra to share – just be sure to get 2 cups of mature kombucha from them as well. There are places online where you can purchase scobies, or you can make your own, which I will explain in a future article. Scobies are perfectly safe to handle, with a weird rubbery texture, just handle them with good hand hygiene since they are a colony of bacteria and we want to keep the scoby clean of bad bacteria.
Black or green tea: Generally kombucha recipes call for black tea. I prefer green. Most store-bought kombucha is a mix of the two. Take your pick! I think the green has a lighter, more delicate taste.
The amount and kind of sugar: My original recipe called for 1 cup of sugar to 4 cups of tea. After trial and error, I found that less sugar produced a better kombucha and I’ve settled on 1/2 cup of sugar. I tried 1/3 of a cup, but the kombucha wasn’t as fizzy. I have heard of people using other kinds of sugar, even coconut sugar, but I just use plain white sugar. I found coconut sugar to have a weird aftertaste.
Juice or fruit: As I stated in the recipe, I use homemade cranberry juice for the second ferment. There is no added sugar in this juice, which I like, especially since I actually want the kombucha to be low in sugar at the end of the process. You can use any juice, though, and if your first fermentation is giving you a low-sweetness tea, maybe you’d want to use juice with more sugar, to give a little punch to the second fermentation. You can also add pieces of fruit during this phase.
Bottles or jars: For the second fermentation, you can use anything that can seal. Just make sure you use a quality bottle that can hold up to the possibility of a lot of pressure building up. The Otis brand swing-top bottles get great reviews on Amazon for kombucha brewing and are what I’m just starting to use. Swing top lids are nice just because you can always unseal them, even if the pressure builds up, unlike with Mason jar lids where the lid can become difficult to get off. There are plastic lids with rubber seals that are made specifically for fermentation.
So there you have it! Again, this isn’t my expert recipe. This is my simple recipe that I use for kombucha that I thoroughly enjoy drinking! Maybe you will, too! Happy brewing!
Support Song Dog Journal and share to social media!
Yesterday was cranberry juice canning day! We wanted to get our two freezers combined into one, and thanks to Black Hills Bulk Foods I had 22 twelve-ounce bags of cranberries in the freezer, waiting to be juiced. Now I’m down to 11 bags with 6 gallons of canned juice sparkling on my kitchen counter. Beautiful!
There is a little bit of a story behind this, actually. Ever since leaving the fire department at the end of February 2022, I have struggled terribly with sleep. Sleep issues are common in that line of work. I hoped it would get better as time went on and it just didn’t. After Brad and I got married, I could work from dawn until dusk, physical work, working in the heat, and by all reasonable estimations I should have been exhausted. Yet I’d lay awake in bed for literally hours. I struggled with restless leg issues as well. I couldn’t take melatonin, since I would have these weird, lucid dreams, so I tried valerian and Benadryl, occasionally with a small glass of wine. I tried magnesium for my legs, with marginal results. Basically, nothing helped.
On a whim back in November, unrelated to my sleep issues, I got some fresh cranberries at Sam’s and made up a batch of juice, and enjoyed adding a quarter to a half cup of it to a glass of water to drink, hot or cold. After a week of doing this, it occurred to me that I had slept well every night, and the only thing I had changed was that I was drinking cranberry juice. Long story short, I did a little research and found out that cranberries are a natural source of melatonin. Over the last 6 weeks, since adding cranberry to my diet, I have had the best sleep I have had since February.
I used a recipe from the website Practical Self Reliance. She shares a method of canning cranberries and sugar in water, and a method of canning extracted juice. I chose the latter method.
This is an unsweetened cranberry juice, although sugar can be added if preferred. It takes roughly 4 12-ounce bags to get a full 7-quart canner of jars.
The basic method is as follows:
1. Simmer approximately 3 pounds cranberries in approximately 4 quarts water. Simmer until the berries have popped, about 10 minutes, and lightly mash them. Strain off the juice, pouring everything through a cheesecloth-lined colander.
2. Add cooked berries back to pot with approximately 2 quarts of water. Again let it simmer for about 5 minutes and mash the berries. Drain off the juice.
3. Add cooked berries back to pot with approximately 1 quart of water. Simmer for about 5 minutes and mash the berries, and drain off juice for the last time. Discard the pulp. It is pretty flavorless at this point, but my chickens loved it, especially after it had sat for a couple days and fermented a little…
4. Pour hot juice into quart jars with 1/4 inch headspace. Wipe rims and seal jars hand tight. Process for 10 minutes in a water bath canner – adjust the time for altitude.
For each of the rounds of juice extraction, I used a little extra water just to make sure I’d end up with a full 7 quarts. If you’ve done much canning, you know the frustration of being a cup short of having a full canner of jars!
I love adding the juice to cold water for a refreshing drink or hot water for a delicious tea in the evening. And I have loved the sleep I have gotten since I started adding cranberry to my diet on a daily basis! Enjoy!
Support Song Dog Journal and share to social media!