It is that time of year, when you walk into a feed store and hear the telltale cheeping from those bins of day-old chicks. Happy days for those of us happy chicken keepers! That also means spring is coming, which means everyone should be happy when they hear chicks cheeping!

As people are getting into the mode of chick season, I wanted to share a simple DIY brooder box setup that I have found to work really well. It is easy to maintain, easy to clean and access, and is cheap, which is a plus. There is a lot of info out there and a lot of ways to overcomplicate a brooder box setup or make it more expensive than it needs to be. I wanted to give my nuts-and-bolts, budget-conscious setup.
Let’s break it down!
The Box
The simplest form of a brooder box is just a container and a heat source. That’s all you need! No fancy galvanized steel bin or brooder panels are necessary, but of course you can go that route if you so choose. The main requirement is that the box have solid sides, to retain heat. The number of chicks will dictate the amount of space needed, obviously. A large Rubbermaid bin, the 66 quart kind with a locking lid that you can get at Walmart for $10, works really well. I have two bins, and have found that each one can comfortably house about 10 chicks for roughly two weeks. As the chicks grow they’ll quickly outgrow whatever setup you have! The taller the bin, the longer it will take for them to escape.
Even if you are starting with just a few chicks, I’d recommend having two brooder boxes. If you end up with a sick chick or one is getting picked on, or the chicks just plain old take up more space than you expected, then you have a fallback. When I got my August chicks from McMurray Hatchery, I had one chick that needed a little extra care and was glad to be able to almost immediately divide my chicks into two groups so the smaller ones didn’t get pushed around.
The Cover
The cover needs to allow good circulation of heat and humidity in and out of the brooder. For the first few days, a cover is really only needed to keep curious critters out of the brooder box, but after a week tops, the chicks will be actively looking for escape. For a super simple cover, just cut a large opening in the plastic lid with a reciprocating saw and cover with window screen, tacking the edges down with gorilla tape. We made one cover this way, and another using lath and screws to fasten the window screen to the plastic, which does look pretty spiffy. I honestly prefer the gorilla tape method for its simplicity and how light the cover ends up being. It isn’t as pretty but it is so ridiculously simple. If you wanted something a little sturdier, you can easily construct a lightweight wooden frame just larger than the dimensions of the top of the brooder box and cover it with chicken wire. For my indoor setup, window screen is perfectly sufficient.

The Heat Source
This is where brooder setups can become a little controversial, and for good reason. It can also become way overcomplicated, in my opinion. Basically there are two methods of heating the brooder. Either a heat lamp (the old fashioned way), or a brooder heat place, similar to this one by the brand RentACoop or this one by Brinsea Products. Both are effective, but the controversy is over fire safety. There is always a risk of fire when using heat lamps, but there is a substantial price-point difference, so make your best judgement. Plenty of people still use heat lamps. The fire risk does make me a little nervous, though, and I would like to try heat plates at some point.
A brooder plate is a radiant heat-emitting panel that is height-adjustable for your growing chicks. Pretty simple and self-explanatory. Don’t opt for a cheap one, since the reviews are pretty telling, with plates either getting too hot (and ironically being a fire hazard) or not providing enough heat.
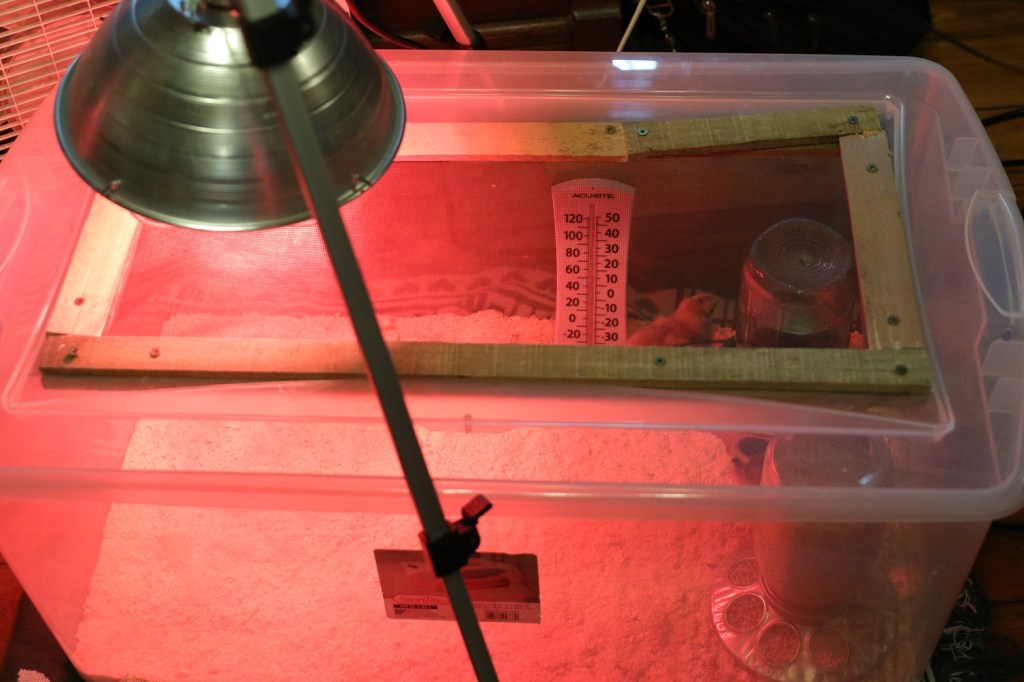
If you go with a heat lamp, you need some way to suspend the light above the brooder. I prefer it to hang straight down as opposed to pointing in at an angle, and make use of one of my many camera tripods, sometimes getting away with one heat lamp for both brooders, centering the tripod over the two boxes. Figure out what works for you. With it hanging straight down, there is plenty of heat right under the lamp, but there is room for the chicks to spread out into cooler parts of the brooder as well.
Get a cheap thermometer to monitor the temp, at least until you have a good idea of what sort of heat your chosen heating method is putting out. People can get really specific about the optimal temps for chicks, with charts related to how warm they need to be for each of the first 8 weeks of their lives and how to lower the temp so much each week, etc. Chicks do need it warm – in that 90-95 degree for the first week. But they’re also pretty resilient little things. I have had it well over 100 degrees (probably closer to 115) directly under the heat lamp and they find the spot in the brooder where they are most comfortable. If the entire brooder is too hot or too cold, make adjustments. Too cold? Lower the heat lamp. Too hot? Raise it up. Pretty simple. Depending on how cool it is in your house, you may find it handy to add a second heat lamp for a few days just to keep that temperature high enough.
Heat lamp bulbs can either be red or clear, and make sure they are splatter resistant for safety purposes. The red bulb is supposed to not mess with the chicks’ natural cycle and make them less prone to picking at each other.
So that’s my simple brooder setup! Not much to it. I’ll talk bedding, feeders, waterers, and other chick keeping tips in future articles.
Leave pictures of your DIY and frugal chick keeping setups in the comments for others to see! Happy chick days!


Laura, you have truly become the rancher’s wife. I’m amazed! You make it sound so simple!
LikeLiked by 1 person
Thank you, Mary! God is good and I’m loving this life He has given me!
LikeLike
Aaaaaaw chicks 🐥 are so cute. When I happen to go into a feed store I absolutely have to stop and check out whatever babies are there, can’t help myself.
Thank you for sharing your stories I really enjoy “hearing” about all your critters.
LikeLiked by 1 person